A wood stain is a coating that serves the dual purpose of enhancing the looks of wood and offering a certain degree of protection. Whether you are an amateur or professional woodworker, you can save a lot of money by staining wood yourself.
Wood staining requires a bit of skill, knowledge, and experience. If done well, it can make wood look good and even protect it. A poor stain job, however, can spoil its appearance. This post explains the best way to stain wood, including some best practices.
You can learn more about the different types of wood stain in another of our interesting posts.
Items Required to Stain Wood
Collect the following items so that you can work efficiently and continuously on your wood staining job:
You will need:
-
- Unfinished wood
- Sandpaper (120 grit)
- Wood conditioner also called pre-stain
- Wood stain
- Wood stain topcoat
- Rags
- Paintbrush
The Best Way to Stain Wood
Although woodworkers deviate slightly from each other in the way they stain wood, there are a few universally accepted procedures. Follow the steps outlined below to do a good wood staining job:
Prepping the Wood
By prepping the wood, you do two things. Firstly, you remove grime from the surface and any protective coating that the seller might have added. Secondly, you make the surface conducive to accept the stain.
Next, lightly rub the wood with 120 grit sandpaper until the surface is uniformly smooth and without any surface marks.
After sanding, take a damp cloth and wipe it to pick up the debris and raise the wood fibers.
Apply the Pre-Stain

Once your wood is clean and dry and properly prepped, you can apply the first coat, which is the pre-stain.
Use a clean paintbrush to apply the pre-stain to a small spot, preferably one that isn’t visible.
Wait for 5 to 15 minutes until the pre-stain is dry. Then, if you are satisfied with the results, you can proceed to apply the stain.
Applying the Stain

Open the stain container and stir gently, taking care not to cause any bubbles to form.
After applying the pre-stain, apply the stain in an inconspicuous place on the wood. For example, apply it underneath a table or inside a chair leg or a scrap of wood.
If you get satisfactory results, you can proceed to apply the stain.
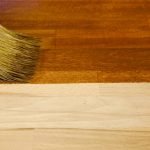
Dip the tip of your paintbrush in the stain and apply it on the wood using light, uniform strokes along the direction of the grain.
Brush away any drips that may form, as this will cause blemishes on the surface of the wood.
Use short strokes on each wood face to distribute the stain evenly over the surface.
Wait for 5 to 15 minutes for the stain to absorb. The longer you allow the stain to soak into the wood, the better the finish. It also makes the wood darker with a longer exposure time.
Wiping the Excess Stain
While the stain is still wet, you would do well to wipe off the excess stain with a rag. You may need to use multiple rags – prevent any excess stain from remaining on the surface of the wood.
Excess stain can cause wood to look blotchy once it dries. However, there is also a possibility that the excess stain may not dry at all, causing the wood to remain tacky indefinitely.
It is always advisable to apply a top coat but first allow eight hours or overnight for the stain to dry completely.
Applying a Topcoat

Finally, when the stain is completely absorbed into the wood and dried, you can apply the topcoat.
You can use polyurethane or shellac, which provides warmth to the finish. But other types of topcoats like water-based products also produce satisfactory results.
As you did with the pre-stain and stain, mix the topcoat gently to avoid bubble formation.
Now, dip the tip of your paintbrush into the topcoat liquid and apply it evenly over the wood, using steady strokes in the direction of the wood grain.
If you want a single layer of topcoat, you need to wait for the wood surface to dry for a few hours overnight to use the wood.
If you want to apply multiple coats, rub the surface of the wood with 180 grit sandpaper over the wood once the first coat is dry.
Now wipe the wood with a dry cloth and apply the next coat.
Repeat this process until you get satisfactory results.
Best Practices for Staining Wood: Hints and Tips

- Use protective gear like safety goggles, gloves, and suitable clothing while handling stain.
- Apply your stain to a test patch or wood scrap before applying it to the main wood.
- You can use an inexpensive brush to apply pre-stain, but use a good-quality brush for applying stain and topcoat.
- Ensure sufficient stirring to ensure that you blend all the stain ingredients, namely dyes, pigments, and mineral spirits.
- Work on stain in a well-ventilated area to avoid inhaling the fumes that could be hazardous.
- You can get a good finish with a rag, but if you use a paintbrush, ensure to move it in the direction of the grain and not against it.
- You can regulate the lightness or darkness of stain by varying the thickness of the coating that you apply
- When you wipe off excess stain, ensure to move your rag in the direction of the grain and not against it.
- Remember that a stain only imparts color, not a finish. The type of finish you achieve depends on the topcoat and how you apply it.
- Apply more stain if you want the wood to appear darker.
- You can combine stains to customize your color, but make sure to use:
-
- Stains of the same manufacturer and
- The same type of stain, that is, all oil-based or all water-based
- If you are mixing stains, note the proportions if you need to repeat it later.
- Stain has a long shelf life, and you can reuse it. It does not deteriorate the way paint or other types of finish do. You can use a single can of stain multiple times, perhaps needing to discard any skin that forms on the surface.
Conclusion
Staining wood is not rocket science. But there are procedures to follow if you want to get good results. Prep your wood properly. Apply the pre-stain, stain, and topcoat/s correctly with smooth, even strokes. If you follow the steps and best practices outlined here, you can create beautiful stained woodworking projects.
Happy woodworking!