One of the most versatile and easy-to-work-with woods is pine. Pine is used in various woodworking projects like tables, cabinets, desks, flooring, and cabins, just to name a few. It is a light but strong softwood. However, a question that many people have is how to stain pine wood.
Quick Answer:
To stain pine wood, first sand the surface. Start with medium sandpaper (80-120) and finish with fine grit (220-240). Clean the wood surface with a damp cloth without leaving excess water on the surface. Apply the stain using a clean cloth or brush, following the wood grain. Allow the stain to penetrate as recommended on the label before wiping off the excess. Apply additional coats for a darker finish, allowing drying time between each. Finally, you can protect the stained wood with a clear topcoat, such as polyurethane.
*Pre-stain wood conditioner. This is an optional step (between sanding and applying stain). It adds time to your project but often improves the end result with a smoother finish, especially when using a dark stain on light pine.
Below we go into much more detail about other things to consider and the step-by-step instructions to stain pine.
Background

If you have pine furniture and cabinets, you can improve the look of your furniture by staining it. Because of the dense grain of pine, you may find it a challenging task. However, using a few handy tips you can enhance the look of this fine wood. There are certain procedures you need to follow for prepping, staining, and sealing the wood.
These procedures are not rocket science but you need to know what you are doing. If you do not use the correct procedures for staining, you can end up with blotchy surfaces and murky colors. So, you need to not only follow a set procedure, but you need to use suitable staining products.
One of the primary jobs you would do before staining the wood would be prepping the wood and sealing it. You may come across several homemade pine projects which are finished through staining and varnishing. The light-colored wood offers great scope for adding a finish to enhance its already fine, pale shade. You can use a variety of stain colors. If you want your project to have a rustic look, then a blotchy finish might not be an issue.
Dealing with Knots and Pine Resin
But if you want to create fine furniture then you would have to impart a fine finish to match the final appearance of your project. Most of the blotchiness that you get while staining pine is due to the presence of excessive knots.
These knots occur from the way the tree grows with multiple branches protruding. It creates the effect of an end grain in the middle of a long grain. But the effect is often to create a knot hole. These knot holes soak more stain and unevenly as well.
A way of minimizing this issue is to choose your pine boards carefully. You could also cut out pieces with excessive knots. But this process has its limitations.
Another aspect of staining pinewood is the high resin content in the wood. This resin tends to leach to the surface and interfere with the stain application process. It results in uneven staining. Here again, you would have to select your wood carefully to ensure that there is not too much resin extrusion.
Pre-treating the wood by using volatile chemicals like mineral spirits can also minimize the effect of the resin. Some woodworkers use detergent to deal with the excessive resin. So, as you can see, there are many different approaches to dealing with knots and resin while staining pinewood.
Choosing the Best Stain
The best choice for staining pinewood is undoubtedly an oil-based stain. You will find this type of stain particularly useful when the wood has a high oil or resin content. The issue with water-based stains is that they do not soak adequately into the wood the way oil-based stains do.
Water-based stains are more likely to remain on the surface where they will dry out. The result is that if you use a water-based stain, it can become flaky and it will soon peel off. You will observe this when you use water-based stain where the wood is exposed to the elements. So, you may use water-based stains only with a water-based finish. Even water-based varnish is not recommended while staining pinewood.
Therefore, oil-based stain and varnish are the best combinations to use on pinewood. If you use an oil-based stain, you need to give it seven days for the surface to dry completely.
How to Stain Pinewood
Coming to the main issue of this post, we now show you how you can make your pinewood look attractive. You need to do a good deal of prep work and the steps involved are sanding, conditioning, staining, and adding a top coat.
Here are the basic steps that you need to follow for staining pinewood:
Sanding and Conditioning
Sanding will depend on the condition of the pine you’ve got. Lumber can range from rough cut if you got it from a local mill to pre-sanded boards from big box stores.
If the pine is relatively rough, use 80-grit to 120-grit sandpaper you need to level the wood surface. If you are staining the wood for the first time you can use 80-grit but if you are applying stain to wood over an existing finish, then 120-grit sandpaper would be a good choice.
When you rub the surface of the pinewood, use a wide, circular motion. Take a bit of time and patience to ensure all the high points are smoothened down. The purpose of the sanding is to open up the wood pores to make them take in the stain better.
You can use a sanding block that applies pressure more consistently and is easier on the hands. If you have a power sander, you can achieve satisfactory results faster.
Smoothing Out

After leveling the pinewood, you need to use higher-grit sandpaper, a good guide is to start with 120-grit and finish with 220-grit
Clean the wood surface with a damp sponge. Ensure not to leave excess water on the wood. It will help to open up the wood pores further and will enable the stain to soak in more readily.
Applying Pre-stain Conditioner
Now, you can apply pre-stain conditioner to the wood using a sponge or a brush. A pre-stain conditioner helps to seal the wood to avoid blotches occurring later. Ensure to cover the entire surface of the wood with the pre-stain conditioner. Make sure that your work area is well-ventilated and using a respirator is also a good idea.
Finally, you can wipe off the excess pre-stain conditioner with a dry cloth 10 to 15 minutes later. It will give ample time for the conditioner to soak into the wood. When you wipe off the excess conditioner, do so with long, sweeping strokes which will prevent streaking.
After wiping off the excess conditioner leave it to set. It will take up to two hours. We need to place the pinewood in a clean area with low humidity for it to dry adequately.
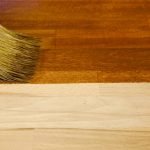
Applying Stain

Once your pre-stain conditioner has dried, you can start to apply the stain. Gel stain is one of the best types of stain to use on pinewood. Apply the stain evenly and thinly with a brush. Later, you can dip a lint-free cloth in the stain and blot it across the surface. Later, brushing the wood in circular motions back and forth will ensure an even application.
- If you want a light, warm color, you can use a golden shade. On the other hand, for an orange hue, you can use a grey stain and you can also apply darker shades like mahogany or walnut.
- It is always better to apply your stains to a test piece and see which shade works best for you.
- Wait for two to five minutes for the stain to soak into the pine and then wipe off the excess. You can do this with a clean shop cloth and continue to wipe until you do not pick up any excess stain in your cloth.
- Now that you have applied the first coat you need to wait a couple of hours for the stain to dry. Once the stain has completely dried you can continue to apply additional coats until you reach a satisfactory shade.
- Be mindful of the dust on each coat that you apply. If you notice any dust settling on your coats of stain, you can lightly sand the wood with 150-grit sandpaper taking care not to remove the fresh layer of stain.
- When you have applied your final coat, wait for about 24 hours before you apply varnish or a sealer.
Finishing
Now that you have a satisfactory stain on your pinewood surface, you can proceed to apply a suitable finish but not before the wood is dry and clean. Wipe it with a dry lint-free cloth to get rid of any dust that might have settled on the surface.
Now, you can seal the surface using a polyurethane clear varnish that will seal off the wood surface completely. You can apply multiple coats but ensure to apply each evenly and after the previous coat dries.
As a final touch, you can rub 180-grit sandpaper over the surface. It might not be required if you are satisfied with the final look of your pinewood. By now, you should achieve a fine, polished, and professional-looking wood surface.
How to Stain Pine Plywood
Pine is a popular wood from which we make plywood. You will find an abundant supply of pine plywood at your local lumberyard. Plywood on its own is a versatile and cost-effective solution for woodworking projects and construction work.
Whether you apply paint, stain, or simple varnish to pine plywood, you need to follow a set procedure similar to but slightly different than if you were going to stain solid pinewood.
Prepping the Pine Plywood for Staining
Any type of plywood can be complicated to stain, and more so for pine plywood. You do get factory-sanded plywood but if it doesn’t come pre-sanded, you will have glue leaching through the plywood to the surface.
However, you can improve the condition of the surface by using 320-grit aluminum oxide sandpaper and ensuring that the paper is either light-grey or black but not any other colors.
Sand in the direction of the grain. While sanding you need to take care not to go through the top veneer because pine plywood is nothing but an extremely thin coating of pinewood veneer on the top surface. You could easily sand off the top surface if you are not careful.
Once you have completed sanding the surface, wipe it down with cotton rags and then your pine plywood is ready for staining.
Applying the Stain

The first step in staining pine plywood is to get all your material and gear together.
What you Need
- Pine stain
- Pine sealer
- Absorbent rags
- Sanding block
- Rubber gloves
- Drop cloths
- Splash-proof goggles
Once you have the basic items required for sanding the pine plywood, depending on your skill and experience you can stain the plywood to look like expensive and exotic woods like cherry, mahogany, oak, and walnut.
You get at least two grades of pine plywood. The plywood you should use for building furniture needs to be grade A or grade B.
Steps to Follow
- Keep all your material and equipment ready.
- Cover the area with drop cloths as you don’t want to make a mess of your shop floor.
- Ensure to avoid inadvertently dropping stains on areas where you don’t want to stain because it will soak into the plywood and you won’t be able to remove it.
While Staining

- Now apply the stain using waste rags slowly in a single direction spreading the stain evenly on the surface of the plywood.
- Repeat the process several times after each coat ensuring that the previous coat has dried.
- Once done, dispose of your rags carefully in a container outdoors.
- Be aware that rags soaked in stain can ignite spontaneously, therefore it is a fire hazard.
Final Touches
- Once the stain dries, apply pine sealer with a paintbrush.
- Ensure to apply the product evenly, going in one direction along the woodgrain.
- Here again, you can sand the surface of the pine plywood with a 220-grit sanding block in between coats.
- Ensure that the previous coat has dried before you sand and apply successive coats.
- The more coats you apply, the darker shade you will get.
It’s also a good idea to add some black or very dark-brown stain with lighter colored stain to create woodgrain-like patterns. It depends on your individual skill. You might like to practice on a test piece before you get the desired results. You should perform this streaking procedure on the final coat.
Conclusion
Here we have covered in as much depth as possible the techniques and procedures you need to know for staining pinewood. Being a difficult wood to stain, you need to follow certain steps which we have outlined here.
The secret behind staining any type of wood successfully is to experiment and practice until you get it right. Pinewood is one of the most challenging woods to stain. But with a little bit of practice on a few test pieces, you can create some beautiful combinations in stain.
You need to use a little bit of imagination and be creative to produce some smart-looking pinewood or pine plywood in your woodworking projects. We hope that the information that we have provided here will give you a better insight into how to stain pinewood and that you can put this knowledge to use in your future woodworking projects.