
It’s always the woodworker’s conundrum to procure wood that is dry enough to work with. A freshly-cut tree can show a moisture level of 80% or above. It is too high a moisture level to work comfortably with. Another issue is the possibility of the wood getting deformed as it dries at a later stage.
To get adequately dried wood, you sometimes have to resort to some type of drying procedure. There are different ways to dry wood. We feature some of those ways in this post. You can decide on a method that suits you best if you need to dry wood.
The first thing to do is to buy a wood moisture meter. It is a small handheld meter with two probes that you press onto the surface of the wood. You will get a direct reading of the percentage moisture content in the wood.
The minimum percentage should be between 9% and 14% for outdoor wood and 6% to 8% for indoors wood. Experts may differ in what they consider to be the ideal moisture content, but you can safely use these figures.
Now, let us move on to the different drying techniques for wet wood.
Air Drying
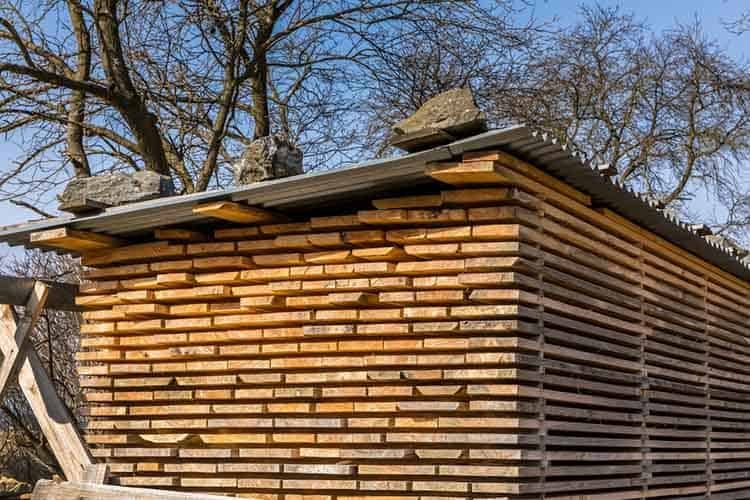
Air drying is one of the most popular methods wherein you dry the wood using natural air. There are a few deviations that we shall also consider.
Step 1: Choose a Location
Regardless of the quantity of wood you have for drying, you need sufficient space for stacking up the wooden planks. The area that you allocate can be an indoors or outdoors location. You can dry your wood outdoors only if your area has mostly dry weather.
Step 2: Use Stickers
Stickers are strips of old wood about 1 to 2 inches in width. They should be long enough to span the width of the planks you want to dry. Place the stickers parallel to each other at a gap of about 16 inches between each other along the line where the planks will lie.
Place the first plank on the line of stickers. Now put another lot of stickers on the first plank and place the second plank on them. Repeat the process until all your wood forms a stack, with the stickers separating each plank.
The idea of using stickers is to provide enough space for the air to reach both surfaces of each plank. It also prevents the moisture from the ground from getting into the wood.
Step 3: Weigh Down the Stack
Once you finish stacking the wood, you need to add some weights to the top of the stack. You can use bricks, blocks of stone, or barbell weights. Adding weights to the top of the stack prevents the wood from warping as it dries.
If you have your wood outdoors, then placing a thick plywood sheet is a good idea. It will prevent your wood from getting wet if it rains.
If you have followed the above steps, your wood should dry fairly fast. The speed of drying depends on the temperature and relative humidity of the surrounding air. If the weather is hot, it will dry faster. In humid weather (like if you live near the sea), it will take longer to dry.
Kiln Drying

A kiln is a type of oven used to heat objects for a prolonged period. Typically, we use kilns to bake bricks and ceramic and pottery items. Among the other uses of a kiln is to dry wood.
Wood drying kilns come in a variety of different types. A few of the common types of wood kilns are conventional wood dry kilns, solar kilns, and vacuum and radiofrequency kilns.
As a woodworker, owning a kiln isn’t likely. But you can dry your wood in a kiln if you have access to one nearby. The length of lumber that you can use in a wood kiln is restricted to the dimensions of the kiln.
Drying wood in a kiln is one of the fastest wood drying methods. You can have dry wood within a few hours. Another advantage of using a kiln to dry wood is the capability of controlling the temperature and humidity during the drying process.
Wood Drying Using a Microwave

Like huge kilns, industrial wood-drying microwaves exist. Keep in mind that microwave drying is only suitable if you have smaller wood pieces. If you do not have access to an industrial microwave, then you can use a regular domestic one.
If you use a domestic microwave, the dimensions of the microwave restrict the size of wood pieces. Be careful about the time you leave the wood in the microwave. You may end up overheating it from the core, as it tends to happen with microwaves.
You can use the microwave intermittently to prevent such overheating. Regarding the time to allot for microwaving, you can consider roughly two minutes for 1.5 inches of thickness of wood.
Ensure that you monitor the moisture content closely throughout the process. A microwave can dry wood up to ten times faster than with a kiln.
Wood Drying Tips
Here are a few tips and tricks that should help you in your wood drying work:
Indoors is Best
Outdoors, you have the advantage of the sun, but the possibility of bad weather always looms ahead. If you dry your wood indoors, you also have the advantage of setting up a heating system or air circulation process.
Choose Your Outdoors Location Carefully
If you have no choice but to dry your wood outside, choose a sunny and windy location. You will need to make provisions for protecting the wood from the rain in case the weather suddenly deteriorates.
Use Fans and Dehumidifiers
If you dry your wood inside, you can accelerate the drying process by directing a fan on it. You can also use dehumidifiers which are devices that dry the surrounding air. The wood will dry at a much faster rate in the presence of dry air.
Bulbs and Heaters
Adding a heat source to the room where wood is drying can accelerate the drying process considerably. You can use high-wattage incandescent bulbs or convection heaters. Just be careful not to place the heat source too close to the wood to prevent fire.
Conclusion
Whether you do air drying, kiln drying, or microwave drying, the result is the same. You end up with sufficiently dry wood that you can work with. It is extremely useful to know the moisture levels to aim at.
If you have wet wood that you need to dry (this may not always be the case), now what to do. Depending on your convenience, you can choose the wood drying method that suits you the most.
Having total control over the moisture content of the wood you use will result in wood free from deformities. Check the moisture level of newly procured wood to ensure that you always have sufficiently dried wood for your woodworking projects.

